
In this tutorial I will show you how to install CyberPanel on CentOS 7 or Ubuntu 18 server.
Introduction
CyberPanel is fast, modern and secure hosting control panel. You can install it on your VPS or dedicated server. CyberPanel comes in two versions – CyberPanel and CyberPanel Ent. Both of them give you better performance and reduce in resource usage. Moreover, both versions will increase speed and security of your site(s) and server. Front end of both of them is completely same.
Differences Between CyberPanel and CyberPanel Ent
Now let’s write a bit about differences between two CyberPanel versions.
First one, CyberPanel, is open-source and free. It runs on OpenLiteSpeed web server and you can add multiple domains.
Second one, CyberPanel Ent, is enterprise edition and it runs on LiteSpeed Web Server Enterprise. It comes with some premium features and you can add only one domain. If you want to add more than one domain, you have to purchase a license.
Also, there is a comparison page where you can learn more about OpenLiteSpeed vs LiteSpeed Web Server Enterprise.
CyberPanel Features
Best thing about CyberPanel is that it supports multiple PHP versions, free automatic SSL, ModSecurity and file manager. Beside that, you will also get mail, DNS and FTP services. Plus many other features. All that for free.
Installation of CyberPanel is piece of cake because they made simple install script. You can run installation via SSH.
System Requirements
In order to install CyberPanel you need to meet following requirements:
- Installed CentOS 7 or Ubuntu 18.04 LTS operating system
- Installed Python 2.7
- Minimum 1 GB of RAM (I recommend at least 2 GB of RAM)
- 10 GB of space available on drive
rootaccess (or usesudowhen running commands to get root privileges)- static IP address reserved for your server
If your provider has a network-level firewall then you must set up firewall rules so check out Additional – Configuring Firewall Rules section of this tutorial.
Prepare and Install
Update System and Packages
I assume you have basic knowledge of Linux at least. The installation is quite simple but you have to know most used commands and the basics.
First thing to do is to prepare server for CyberPanel install.
You should update your system and that can be done using following commands:
For Ubuntu 18:
apt-get -y update
or
apt update
apt upgrade
For CentOS 7:
yum -y update
Install the Necessary Packages
Next step is to install wget and nano if they are not already installed. I use wget to download CyberPanel install script to server and nano text editor is used to edit files on server. Installation of these packages can be done by using following commands:
For Ubuntu 18:
apt-get -y install wget nano
For CentOS 7:
yum -y install wget nano
Finally, Install CyberPanel
Now it’s time to install free CyberPanel version with OpenLiteSpeed web server. It is completely free for unlimited domains, does not require any license and you can install it using one single command.
Use this command to install CyberPanel:
cd /tmp && wget https://cyberpanel.net/install.sh && sh install.sh
If everything is OK you should see something like this. In order to install CyberPanel, you need to type number 1 and press Enter.
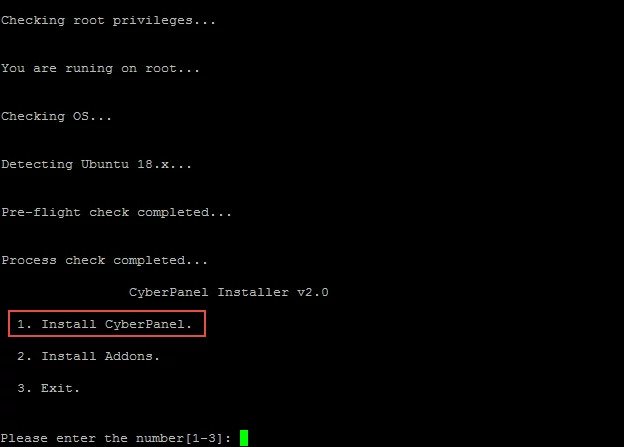
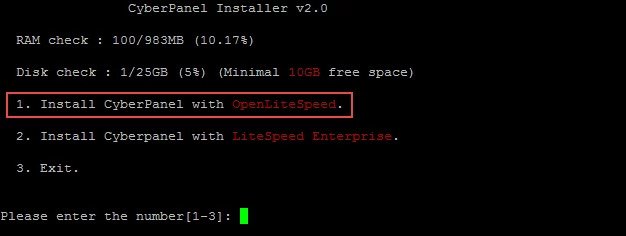
After that, you will see another option chooser. On this second step you need to choose which version of CyberPanel you will install. Because you want to install free version of CyberPanel again type number 1 and press Enter.
Third step is about setting up password of admin account. You can randomly generate admin password, you can specify the password or use default password. In our case we will use default password so type d and press Enter. You can change that password after installation.

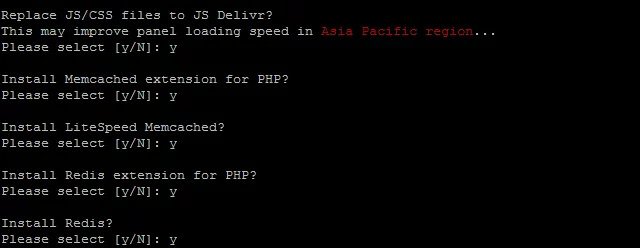
In fourth step you will be asked about installation of extensions. I recommend you to install all offered so type y and press Enter for every extension and improvement.
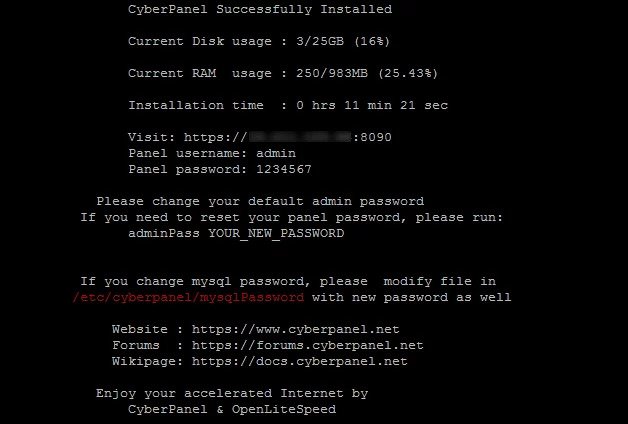
Successful Installation Message
As a result, if everything is OK, you will see message of successful installation! This message also contains informations about changing admin password and mysql root password.
Visit login link provided in final message and you should see something like this:
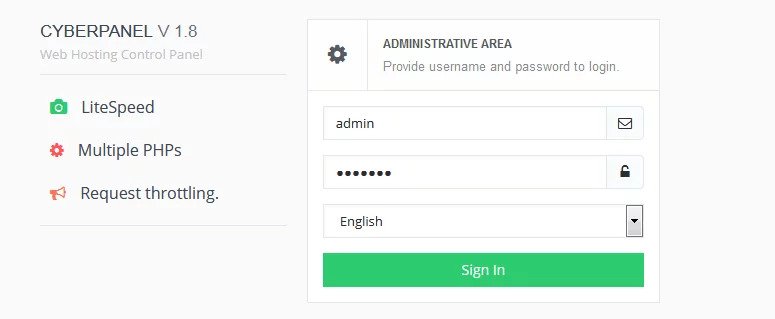
Type admin username and password then sign in and you will see CyberPanel dashboard:

Done! Now you can play with CyberPanel and its features.
Additional Steps and Final Words
Configure Firewall Rules
Firewall rules are additional layer of protection and that protection layer is provided by your hosting provider. It is a way to take control of your server inbound and outbound Internet traffic.
If your hosting provider does not ask you to configure the firewall rules then you can ignore this additional step. Otherwise, you must configure firewall rules to allow your traffic through network for the following ports:
20 – FTP
21 – FTP
22 – SSH
25 – SMTP/EMAIL
43 – WHOIS
53 – BIND/DNS
80 – HTTP / Apache Web server
110 – POP3/EMAIL
143 – IMAP
443 – HTTPS / Apache Web server SSL
465 – SMTP/EMAIL SSL/TLS
587 - SMTPS
873 – RSYNC
993 – IMAP/EMAIL SSL
995 – POP3/EMAIL SSL
8090 – CyberPanel Panel
7080 - WebAdmin
3306 – MYSQL
Final Words
When I installed and configured CyberPanel first time – it was a huge discovery for me! Finally I made my websites load fast. So, I am sure you will spend time exploring CyberPanel.
If your site is made in WordPress, then I can recommend you to install LSCache WordPress plugin. As a result, that can make your WordPress website load very fast!
Our Cloud Hosting comes fully managed wth CyberPanel. Give it a try.